В открытом доступе появилась инструкция по изготовлению солнечного концентратора
24.06.2015
Специально для тех, кто пока не решился перевести свой дом на альтернативные источников энергии, или для кого это очень дорого, проектная группа EnergyTorrent разработала и недавно представила в открытом доступе чертежи и техническую документация для сбора эффективного солнечного концентратора.
Как известно, традиционный солнечный концентратор позволяет получать высокотемпературное тепло для обогрева и горячего водоснабжения дома. Кроме того, с некоторыми изменениями в конструкции устройство может вырабатывать и электричество. Теперь собрать свой собственный солнечный концентратор может любой желающий, скачав довольно подробные инструкции с EnergyTorrent Wiki, а также закупив необходимые материалы и инструменты (которые также перечислены в инструкции).
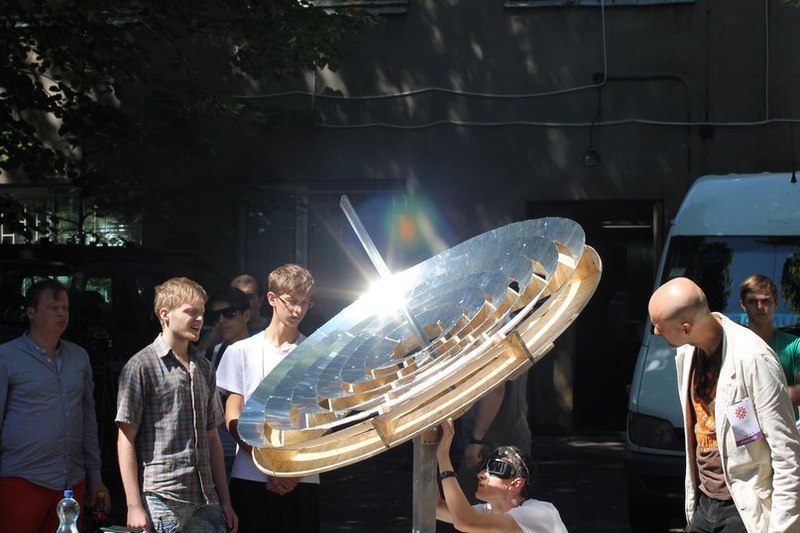
Концентратор Diversity, построенный на основе использования линзы Френеля, способен нагревать центральную область до 260 градусов по Цельсию. Его технические характеристики таковы:
— диаметр: 1,5 метра;
— общая площадь: 1,76 кв. метров;
— эффективная площадь сбора солнечного излучения: 1,39 кв. см;
— общая площадь отражения: 1,64 кв. см;
— фокусное расстояние: 1 метр.
Проектная группа EnergyTorrent опубликовала все необходимые CAD-файлы, которые, кстати, могут быть изменены под конкретные требования. Например, пользователь самостоятельно может изменить размер концентратора или фокусное расстояние солнечного концентратора Diversity, для этого ему, правда, нужно овладеть основами работы в программе Rhinoceros CAD и установить некоторые дополнительные плагины. Однако, все внесенные изменения никак не отразятся на работоспособности устройства.
Стоит отметить, что как сам проект солнечного концентратора, так и инструкции по его изготовлению были разработаны в 2014 году во время солнечного хакатона SunnyDay, организованного EnergyTorrent среди молодых программистов и полностью посвященного солнечным концентраторам. Ну а в настоящее время проектная группа занята организацией нового хакатона, который станет продолжением прошлогоднего мероприятия, но уже на международном уровне, с привлечением заинтересованных команд программистов с разных стран для разработки более мощного солнечного коллектора. Проведение SunnyDay-2015 запланировано на 15 – 20 августа 2015 года.
Вот ссылочку с чертежами и описаниями нашел:
Solar concentrator "Diversity"
1. Description
The Diversity solar concentrator is a device operating on the principle of Fresnel lens collecting radiation from some region of space into 10 cm long focal spot.
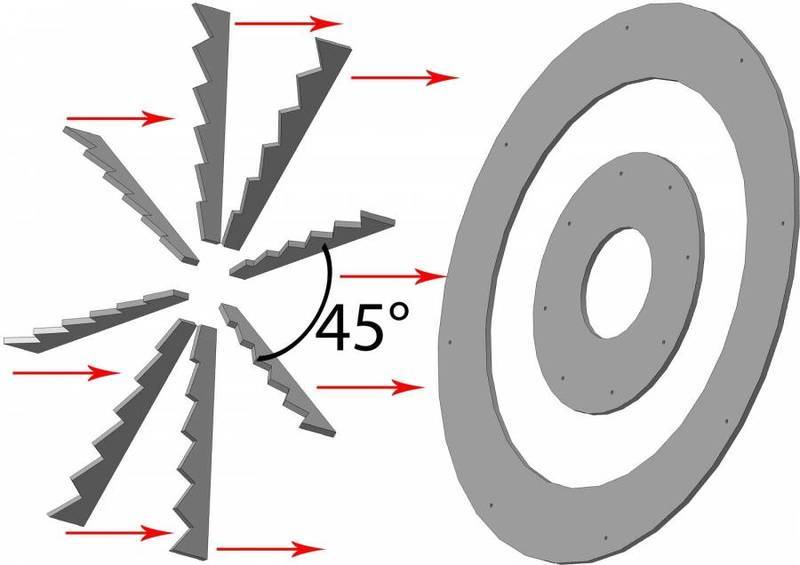
1. Diagram with explanation
The geometric shape, which allows you to collect parallel rays in two-dimensional space is a parabola, and in three-dimensional space is paraboloid of revolution, respectively. However, paraboloid (volume ovoid bowl with the settings) is difficult to simulate in conventional home conditions, so we tried to solve the problem easier. We get the model Fresnel lens as basis, but inverted it and covered the surface of sunlight-reflecting material . To simplify the task we replaced the segments truncated paraboloid on segments truncated cones with the same length of generatrixes. Focus of concentrator converges in some straight line equal to the length of generatrixes truncated cones. Thus, solar concentrator consists of concentric mirror segments truncated cones, attached to the upper face of the base plane.
2. Specifications
Diameter - 1,5 m
Total area - 1,76 m²
Efficient solar radiation collecting area - 1.39 m²
Total area of ??reflection - 1,64 m²
Focal length - 1 m
3. Applications
Solar concentrator can be used for a variety of applications from getting boiling hot water for your morning coffe to using the concentated solar power for heating or electricity generation. In most common cases household-grade concentators are used for cooking food and boiling water.
Also, concentrator can fry eggs.
One of the most promising applications of solar concentrator is using it in combination with electricity-generation devices - high-efficiency solar cells or Stirling engine or steam engine in combination with a generator. EnergyTorrrent team is working on both Stirling engine and steam engine components which coud be used along with solar concentrator to generate electrcity.
4. Advantages
Wind transparency - this type of concentrators are wind-proof, because its very structure contains holes allowing the wind to come through the concentrator instead of overthrowing it;
The relative simplicity in manufacturing;
Ability to make from a simple scrap materials;
Possibility to scale up for bigger dimensions and power.
5. Disadvantages
When manufacturing one must precisely mark up and cut circles teeth supports;
It is necessary to accurately set focuses of the mirrors;
2. The List of Materials
#
Title
Un. of meas.
Quantity
1
OSB-3 15 mm х 1,25 m х 2,5 m
thing
1
2
Armed tape 25 m
thing
1
3
Washer increased М8
thing
12
4
Screw with washer
thing
4
5
Nut DIN 934 М8
thing
20
6
Spring washer М8
thing
10
7
Butterfly nut DIN 315
thing
16
8
Metal thread 50 m
thing
1
9
Steel Track UD27
thing
4
10
Metal Roofing 0,4 mm 1,25 m х 2,0 m
sheet
1
11
Steel Track CW75 – 3 m
thing
4
12
Steel Track CW75 0,55 mm – 3 m
thing
4
13
Corner equilateral 90х90х60х2
thing
4
14
Screw 3,5х45
thing
40
15
Screw 3,5х25
thing
80
16
Screw 3,5х45
thing
40
17
Turning wheel
thing
4
3. Instruments
Marker
Roulette
Elbow
Caliper
Goggles
Gloves
Angle grinder
Electric jigsaw
Blade for electric jigsaw
Electric Drill
Multi-cutter
Screwdriver
Duster
Drill different sizes (∅ 4-12 mm)
4. Manufacturing
1. Modeling
Modeling of concentrator was performed in the software environment Rhinoceros:
1. Solar radiation surface reflection model:
the surface for reflection sunlight was chosen metal roofing sheet with dimensions of 1.25 m by 2.0 m as the basis;
width of concentrated ring is 10 cm was defined as a standard;
the calculated concentrator with a focal length equal 1 m allowed to determine the number concentric rings -6 and place them with optimization on template #1;
pieces sizes for making reflection elements are presented in Table 2;
drawing template are shown in pdf - and dxf formats.
ATTENTION! If you move the markup directly on the roofing sheet metal material pay attention and remember about admission to connect sectors adding 10 mm from one side of the sector!
Table. Options for making reflection elements
# Ring
External diameter, mm
Internal diameter, mm
Removed angle of sector, °
1
224
124
9°28’
2
336
236
19°18’
3
461
361
32°8’
4
605
505
47°36’
5
775
675
64°49’
6
979
879
83°19’
2. Platform model:
as a model for the pattern #2 was chosen standard OSB plate with dimensions of 1.25 m x 2.5 m;
previously calculated angles of reflection rings for design support elements in the amount of 8 pieces placed on the template #2;
identified and placed on the template #2 small and large supporting rings, the latter consists of two half-sectors;
drawing platform elements are in formats pdf and dxf .
2. Parts manufacturing instructions
1. The surface to reflect solar radiation:
to optimize the process we are printed the pattern #1 from file mirrors.dxf full-scale using roll plotter, and stuck it on the roofing sheet, using two-way tape;
cut concentrated segments using the angle grinder or electric jigsaw, with set saw for metal. Smooth out the edges of the segments using grinder, multi-cutter or file;
if it necessary, the surface of the reflection can be pasted with aluminum foil or aluminum tape.
2. Platform:
the platform is made for mounting on any sufficiently rigid material. In the prototype was used 15 mm thick OSB plate;
to optimize the process we have printed the pattern #2 from file osb.dxf full-scale using roll plotter, and stuck it on the OSB plate, using two-way tape;
cut all the basic elements using electric jigsaw, installed with a saw for wood. Smooth out the edges of the segments using grinder, multi-cutter or file.
3. Assembly instructions
1. Reflection items assembling
The items are made from the roof sheet. In the experimental model used roof sheet with thickness of 0.4 mm. Picked element is the frustum. The blank of the element is truncated cone.
In the absence of the roof sheet required size of the frustum you can divide segment into sectors with adding 10 mm to connect the lasts by rivets or screws with overlap.
Scan and picked reflection element
2. Platform assembling
The support elements should be placed along the radii of large ring platform with sliding the next one adjacent element by angle of 45°. The support elements are attached to the large and small ring by screws on the back of the rings so that the screws gone inside to the end of the reference element.
3. Final parts assembling
The reflection elements and platform are connected by screws with washers for better fixation. Originally established smallest element. Screws are twisted in the rib of support element.
Also reflection elements can be fastened to the platform with epoxy glue.
Перепечатка материалов приветствуется, при этом гиперссылка на статью или на главную страницу сайта "Технополис завтра" обязательна. Если же Ваши правила строже этих, пожалуйста, пользуйтесь при перепечатке Вашими же правилами.